
🦸🏻♂️ แนะนำ: Headless WordPress โดยไม่ต้องใช้ WordPress
นับตั้งแต่เกิดเหตุการณ์ Matt Mullenweg กับ WPEngine ผมสังเกตเห็นว่ามีคนในชุมชน Reddit (และที่อื่นๆ) ถามหาทางเลือกแทน WordPress มากขึ้นเรื่อยๆ ไม่ใช่ว่าจะอยากย้ายออกจาก WordPress ทันที แต่ต้องการทำความเข้าใจว่ามีตัวเลือกอะไรบ้าง และการย้ายระบบในอนาคตจะยากแค่ไหน พวกเขาต้องการรู้ว่าจะกระจายความเสี่ยงได้อย่างไร
สำหรับผู้ที่ทำงานกับ headless WordPress อยู่แล้ว Gato GraphQL มีฟีเจอร์ใหม่ที่น่าสนใจ: Headless WordPress โดยไม่ต้องใช้ WordPress
บทความนี้อธิบายทุกอย่างเกี่ยวกับฟีเจอร์นี้ บอกเล่าว่ามันเป็นไปได้อย่างไร พร้อมวิดีโอสาธิต
รัน Gato GraphQL ในฐานะแอปพลิเคชัน PHP แบบ standalone
Gato GraphQL ถูกสร้างขึ้นโดยใช้คอมโพเนนต์ PHP แบบ standalone ที่จัดการผ่าน Composer ในลักษณะที่ คอมโพเนนต์ PHP ทั้งหมดที่ประกอบเป็น GraphQL server ไม่ได้ขึ้นอยู่กับ WordPress!
ด้วยเหตุนี้ GraphQL server จึงสามารถรันในฐานะแอปพลิเคชัน PHP แบบ standalone และคุณสามารถนำมันไปรวมกับแอปพลิเคชัน PHP ใดก็ได้ ไม่ว่าจะเป็น WordPress หรืออะไรก็ตาม
หากกรณีการใช้งานของคุณไม่จำเป็นต้องเข้าถึงข้อมูล WordPress เลย อย่างน้อยสำหรับกรณีนั้น คุณก็พร้อมใช้งานได้ทันที
วิดีโอนี้สาธิตกรณีการใช้งานดังกล่าว: การเชื่อมต่อกับ GitHub API เพื่อดาวน์โหลด/ติดตั้ง artifacts จาก GitHub Actions ระหว่างการพัฒนา:
ในวิดีโอ GraphQL query ส่ง HTTP request เพื่อดึงข้อมูลปลั๊กอิน Gato GraphQL เวอร์ชันล่าสุดที่สร้างขึ้นใน GitHub Actions ซึ่งถูกอัปโหลดเป็น artifacts เมื่อมีการ merge pull request
URL ของ artifacts จาก GraphQL response จะถูกนำไปใช้กับ WP-CLI เพื่อให้ปลั๊กอินถูกติดตั้งอัตโนมัติบน DEV webserver ในเครื่อง สำหรับการรัน tests
(ผมจะอธิบายรายละเอียดเพิ่มเติมในส่วนสุดท้ายของบทความนี้)
ในกรณีการใช้งานนี้ เนื่องจากไม่มีการเข้าถึงข้อมูล WordPress เลย GraphQL server จึงสามารถรันเป็นแอปพลิเคชัน PHP แบบ standalone ได้แล้ว
ถ้าจำเป็น ผมยังสามารถนำมันไปใช้ใน GitHub Actions workflow ของผมได้เลย!
การย้ายแอปพลิเคชัน headless WordPress
เมื่อใดที่คุณต้องการเข้าถึงข้อมูล WordPress มาดูกันว่าจะรันมันโดยไม่ใช้ WordPress ได้อย่างไร
GraphQL schema ที่ Gato GraphQL ให้มานั้นมีฟิลด์สำหรับดึงข้อมูล WordPress: posts, users, comments, tags, categories ฯลฯ
โค้ดใน PHP resolvers ที่ดึงข้อมูล WordPress นั้นขึ้นอยู่กับ WordPress โค้ดนั้นไม่สามารถรันบนแอปที่ไม่ใช่ WordPress ได้
อย่างไรก็ตาม Gato GraphQL ได้แยก resolvers เหล่านี้ออกเป็น 2 แพ็กเกจ:
- แบบ "vanilla" PHP ที่มีโค้ดทั่วไปทั้งหมด
- แบบ WordPress-specific ที่มีการเรียก WordPress methods จริงๆ เพื่อตอบสนอง resolver นั้น
ตัวอย่างเช่น ใน GraphQL query นี้:
{
posts {
id
title
}
}...ตรรกะในการดึง posts ประกอบด้วย:
- ฟิลด์
Root.posts: อยู่ในแพ็กเกจpostsที่เป็นแบบทั่วไป - การ resolve สำหรับ WordPress ผ่านเมธอด
get_posts: อยู่ในแพ็กเกจposts-wpที่เป็น WordPress-specific
การแบ่งโค้ดระหว่างแพ็กเกจ non-WordPress/WordPress อยู่ที่ประมาณ 80/20% หมายความว่า โค้ด 80% สามารถนำกลับมาใช้กับ framework/CMS อื่น และต้องการนำโค้ดเพียง 20% มา reimplemente ใหม่เท่านั้น
นอกจากนี้ ฟังก์ชันทั้งหมดใน Gato GraphQL ถูกส่งมอบผ่าน modules และ modules สามารถเปิด/ปิดได้ตามต้องการ
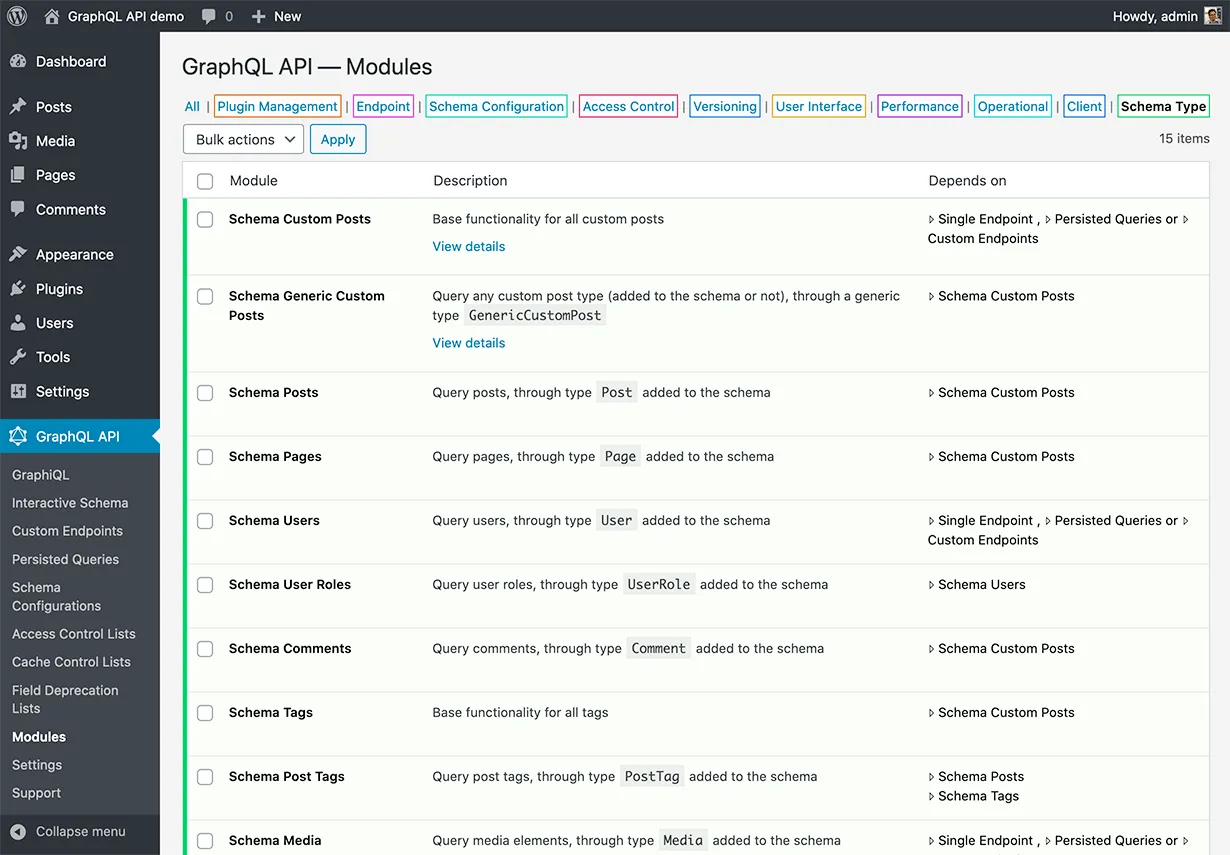
Modules เป็นฟีเจอร์ที่พัฒนาขึ้นเพื่อวัตถุประสงค์ด้านความปลอดภัย: หากคุณไม่จำเป็นต้องเปิดเผยข้อมูลผู้ใช้ใน public API คุณก็สามารถปิด Users module ได้ และฟิลด์ที่เกี่ยวข้อง (เช่น Root.users) จะไม่ถูกเพิ่มเข้าไปใน schema เลย
Modules ถูก map โดยตรงกับแพ็กเกจ PHP พื้นฐาน ดังนั้น เมื่อรัน Gato GraphQL ในฐานะแอปแบบ standalone คุณสามารถเลือกโหลดเฉพาะ modules/packages ที่จำเป็น และไม่โหลดส่วนที่เหลือ
ตัวอย่างเช่น หากแอปพลิเคชันของคุณแสดงข้อมูลเพียง posts, categories และ tags คุณก็ต้องโหลดเพียงแค่แพ็กเกจ posts-wp, categories-wp และ tags-wp (พร้อม dependencies) เท่านั้น
จากนั้น เมื่อย้ายออกจาก WordPress (ไปยัง Laravel หรือ Symfony) ก็ต้องการ reimplemente เพียงแค่ 3 แพ็กเกจ WordPress-specific เหล่านั้นสำหรับ framework/CMS ใหม่ ไม่จำเป็นต้องแตะอย่างอื่นเลย
ด้วยเหตุนี้ คุณสามารถใช้ headless WordPress ได้วันนี้เลย โดยรู้ว่าในอนาคตคุณสามารถย้ายแอปพลิเคชันของคุณไปยัง framework หรือ CMS อื่นด้วยความพยายามน้อยที่สุด
การย้ายมายัง Gato GraphQL จาก API อื่น
หากคุณทำ headless WordPress อยู่แล้ว แอปของคุณน่าจะใช้ WP REST API หรือ WPGraphQL อยู่
น่าเสียดายที่ทั้งสอง API นี้ผูกคุณไว้กับ WordPress: ไม่มี WP REST API นอก WordPress และ WPGraphQL ไม่สามารถรันโดยไม่มี WordPress
แต่โชคดีที่สามารถเปลี่ยนไปใช้ Gato GraphQL แทนได้ และได้รับความสามารถในการย้ายแอป headless WordPress ของคุณออกจาก WordPress
ขั้นตอนที่จำเป็น 2 ขั้น:
- ย้ายจาก WP REST API หรือ WPGraphQL มายัง Gato GraphQL
- Reimplement แพ็กเกจ WordPress-specific ที่จำเป็น
มาดูกันว่าการย้าย API ทำได้อย่างไร
WP REST API ไปยัง persisted queries ของ Gato GraphQL
ด้วย extension Persisted Queries คุณสามารถ publish endpoints แบบ REST ที่ประกอบขึ้นโดยใช้ GraphQL
สำหรับแต่ละ REST endpoint ในแอปพลิเคชันของคุณ คุณสามารถสร้าง persisted query endpoint ที่ดึงข้อมูลเดียวกัน และใช้ endpoint นั้นแทน
ตัวอย่างเช่น GraphQL query ต่อไปนี้สามารถแทนที่ REST endpoint /wp-json/wp/v2/posts/:
{
posts {
id
date: dateStr(format: "Y-m-d\\TH:i:s")
modified: modifiedDateStr(format: "Y-m-d\\TH:i:s")
slug
status
link: url
title: self {
rendered: title
}
content: self {
rendered: content
},
excerpt: self {
rendered: excerpt
}
author
featured_media: featuredImage
sticky: isSticky
categories
tags
}
}ด้วย API hierarchy persisted query สามารถ publish ภายใต้ path /graphql-query/wp/v2/posts/ ทำให้การ map endpoints ง่ายขึ้น
เพื่อ replicate REST endpoint /wp-json/wp/v2/posts/{id}/ ซึ่งดึงข้อมูลของ post ที่มี ID ที่กำหนด เราสามารถระบุ post ID ใน URL param postId
ตัวอย่างเช่น persisted query ต่อไปนี้สามารถเรียกใช้ภายใต้ endpoint /graphql-query/wp/v2/posts/single/?postId={id}:
query GetPost($postId: ID!) {
post(by: { id: $postId }) {
id
date: dateStr(format: "Y-m-d\\TH:i:s")
modified: modifiedDateStr(format: "Y-m-d\\TH:i:s")
slug
status
link: url
title: self {
rendered: title
}
content: self {
rendered: content
},
excerpt: self {
rendered: excerpt
}
author
featured_media: featuredImage
sticky: isSticky
categories
tags
}
}WPGraphQL ไปยัง Gato GraphQL
GraphQL schema จาก WPGraphQL และ Gato GraphQL มีความคล้ายกันแต่แตกต่างกันเล็กน้อย จึงต้องมีการปรับแต่ง
Next.js WordPress starter leoloso/next-wordpress-starter รองรับทั้ง WPGraphQL และ Gato GraphQL starter ใช้ JS logic เดียวกันสำหรับทั้งสองเซิร์ฟเวอร์ ต่างกันเพียง GraphQL queries เท่านั้น
starter นี้มีตัวอย่างหลายรายการของการปรับ queries ระหว่างสองเซิร์ฟเวอร์ ตัวอย่างเช่น WPGraphQL query นี้:
fragment PostFields on Post {
id
categories {
edges {
node {
databaseId
id
name
slug
}
}
}
databaseId
date
isSticky
postId
slug
title
}...ถูกปรับแต่งแบบนี้สำหรับ Gato GraphQL:
fragment PostFields on Post {
id
categories: self {
edges: categories(pagination: { limit: -1 }) {
node: self {
databaseId: id
id
name
slug
}
}
}
databaseId: id
date: dateStr
isSticky
postId: id
slug
title
}รายละเอียด: การรัน Gato GraphQL ในฐานะแอปพลิเคชัน PHP แบบ standalone
นี่คือคำอธิบายรายละเอียดของวิดีโอสาธิตก่อนหน้านี้
เราระบุ GraphQL query ที่จะรันไว้ในไฟล์ retrieve-github-artifacts.gql
query เชื่อมต่อกับ GitHub API โดยรับ access token จาก env var GITHUB_ACCESS_TOKEN มันสร้าง full path สำหรับ actions/artifacts endpoint แบบ dynamic จากตัวแปรที่ระบุไว้ จากนั้นส่ง HTTP request ไปที่มัน
จาก response มันดึง "download URL" จากภายใน artifact item แต่ละรายการ และส่ง asynchronous HTTP requests ไปยังมัน จาก Location header ของแต่ละ "download URL" เหล่านี้ เราได้รับ URL จริงของไฟล์ที่ดาวน์โหลดได้
สุดท้าย มันพิมพ์ URL ทั้งหมดโดยคั่นด้วยช่องว่าง เพื่อความสะดวกในการนำไปใช้กับ WP-CLI
# File retrieve-github-artifacts.gql
query RetrieveProxyArtifactDownloadURLs(
$repoOwner: String!
$repoProject: String!
$perPage: Int = 1
$artifactName: String = ""
) {
githubAccessToken: _env(name: "GITHUB_ACCESS_TOKEN")
@remove
# Create the authorization header to send to GitHub
authorizationHeader: _sprintf(
string: "Bearer %s"
values: [$__githubAccessToken]
)
@remove
# Create the authorization header to send to GitHub
githubRequestHeaders: _echo(
value: [
{ name: "Accept", value: "application/vnd.github+json" }
{ name: "Authorization", value: $__authorizationHeader }
]
)
@remove
@export(as: "githubRequestHeaders")
githubAPIEndpoint: _sprintf(
string: "https://api.github.com/repos/%s/%s/actions/artifacts?per_page=%s&name=%s"
values: [$repoOwner, $repoProject, $perPage, $artifactName]
)
# Use the field from "Send HTTP Request Fields" to connect to GitHub
gitHubArtifactData: _sendJSONObjectItemHTTPRequest(
input: {
url: $__githubAPIEndpoint
options: { headers: $__githubRequestHeaders }
}
)
@remove
# Finally just extract the URL from within each "artifacts" item
gitHubProxyArtifactDownloadURLs: _objectProperty(
object: $__gitHubArtifactData
by: { key: "artifacts" }
)
@underEachArrayItem(passValueOnwardsAs: "artifactItem")
@applyField(
name: "_objectProperty"
arguments: { object: $artifactItem, by: { key: "archive_download_url" } }
setResultInResponse: true
)
@export(as: "gitHubProxyArtifactDownloadURLs")
}
query CreateHTTPRequestInputs
@depends(on: "RetrieveProxyArtifactDownloadURLs")
{
httpRequestInputs: _echo(value: $gitHubProxyArtifactDownloadURLs)
@underEachArrayItem(passValueOnwardsAs: "url")
@applyField(
name: "_objectAddEntry"
arguments: {
object: {
options: { headers: $githubRequestHeaders, allowRedirects: null }
}
key: "url"
value: $url
}
setResultInResponse: true
)
@export(as: "httpRequestInputs")
@remove
}
query RetrieveActualArtifactDownloadURLs
@depends(on: "CreateHTTPRequestInputs")
{
_sendHTTPRequests(inputs: $httpRequestInputs) {
artifactDownloadURL: header(name: "Location")
@export(as: "artifactDownloadURLs", type: LIST)
}
}
query PrintSpaceSeparatedArtifactDownloadURLs
@depends(on: "RetrieveActualArtifactDownloadURLs")
{
spaceSeparatedArtifactDownloadURLs: _arrayJoin(
array: $artifactDownloadURLs
separator: " "
)
}PHP logic โหลดโค้ดโดยตรงจาก Gato GraphQL plugin และจากบันเดิล "Power Extensions" (จำเป็นสำหรับการส่ง HTTP requests และฟังก์ชันอื่นๆ)
ในฐานะแอปพลิเคชัน PHP แบบ standalone เราต้องระบุอย่างชัดเจนว่า modules ใดที่จะถูก initialize และระบุ configuration ที่ไม่ใช่ค่าเริ่มต้น
ตัวอย่างเช่น เราบอก module SendHTTPRequests ให้อนุญาตการเชื่อมต่อไปยัง https://api.github.com/repos และบอก module EnvironmentFields ให้อนุญาตการเข้าถึง environment variable GITHUB_ACCESS_TOKEN
โปรดทราบว่า GraphQL schema ถูกสร้างขึ้นในครั้งแรกที่ GraphQL query ถูกรัน และถูก cache ลงดิสก์ ด้วยวิธีนี้ ตั้งแต่ครั้งที่ 2 เป็นต้นไป ไม่มีโค้ดที่คำนวณ schema ถูกรันเลย ทำให้การรันเร็วขึ้น
สุดท้าย แอปแบบ standalone จะ initialize GraphQL server, รัน query กับมัน และพิมพ์ response
<?php
// File retrieve-github-artifacts.php
declare(strict_types=1);
use GraphQLByPoP\GraphQLServer\Server\StandaloneGraphQLServer;
use PoP\Root\Container\ContainerCacheConfiguration;
// Load the GraphQL server via the standalone PHP components
require_once (__DIR__ . '/wordpress/wp-content/plugins/gatographql/vendor/scoper-autoload.php');
// Load the PRO extensions via the standalone PHP components
require_once (__DIR__ . '/wordpress/wp-content/plugins/gatographql-power-extensions-bundle/vendor/scoper-autoload.php');
// Modules required in the GraphQL query
$moduleClasses = [
\PoPSchema\EnvironmentFields\Module::class,
\PoPSchema\FunctionFields\Module::class,
\GraphQLByPoP\ExportDirective\Module::class,
\GraphQLByPoP\DependsOnOperationsDirective\Module::class,
\GraphQLByPoP\RemoveDirective\Module::class,
\PoPSchema\ApplyFieldDirective\Module::class,
\PoPSchema\SendHTTPRequests\Module::class,
\PoPSchema\ConditionalMetaDirectives\Module::class,
\PoPSchema\DataIterationMetaDirectives\Module::class,
];
// Configure the modules
$moduleClassConfiguration = [
\PoP\GraphQLParser\Module::class => [
\PoP\GraphQLParser\Environment::ENABLE_MULTIPLE_QUERY_EXECUTION => true,
\PoP\GraphQLParser\Environment::USE_LAST_OPERATION_IN_DOCUMENT_FOR_MULTIPLE_QUERY_EXECUTION_WHEN_OPERATION_NAME_NOT_PROVIDED => true,
\PoP\GraphQLParser\Environment::ENABLE_RESOLVED_FIELD_VARIABLE_REFERENCES => true,
\PoP\GraphQLParser\Environment::ENABLE_COMPOSABLE_DIRECTIVES => true,
],
\PoPSchema\SendHTTPRequests\Module::class => [
\PoPSchema\SendHTTPRequests\Environment::SEND_HTTP_REQUEST_URL_ENTRIES => [
'#https://api.github.com/repos/(.*)#',
],
],
\PoPSchema\EnvironmentFields\Module::class => [
\PoPSchema\EnvironmentFields\Environment::ENVIRONMENT_VARIABLE_OR_PHP_CONSTANT_ENTRIES => [
'GITHUB_ACCESS_TOKEN',
],
],
];
// Cache the schema to disk, to speed-up execution from the 2nd time onwards
$containerCacheConfiguration = new ContainerCacheConfiguration('MyGraphQLServer', true, 'retrieve-github-artifacts', __DIR__ . '/tmp');
// Initialize the server
$graphQLServer = new StandaloneGraphQLServer($moduleClasses, $moduleClassConfiguration, [], [], $containerCacheConfiguration);
/**
* GraphQL query to execute, stored in its own .gql file
*
* @var string
*/
$query = file_get_contents(__DIR__ . '/retrieve-github-artifacts.gql');
// GraphQL variables
$variables = [
'repoOwner' => 'GatoGraphQL',
'repoProject' => 'GatoGraphQL',
'perPage' => 3
];
// Execute the query
$response = $graphQLServer->execute(
$query,
$variables,
);
// Print the response
echo $response->getContent();เพื่อรัน GraphQL query เราใช้ terminal (ใช้ jq เพื่อพิมพ์ JSON output ให้อ่านง่าย):
php retrieve-github-artifacts.php | jqสุดท้าย เพื่อดึง artifact URLs จาก GraphQL response และนำไปใช้กับ WP-CLI เราใช้:
GITHUB_ARTIFACT_URLS=$(php retrieve-github-artifacts.php \
| grep -E -o '"spaceSeparatedArtifactDownloadURLs\":"(.*)"' \
| cut -d':' -f2- | cut -d'"' -f2- | rev | cut -d'"' -f2- | rev \
| sed 's/\\\//\//g')
wp plugin install ${GITHUB_ARTIFACT_URLS} --force --activateดังที่แสดงในวิดีโอ เราสามารถรัน Gato GraphQL โดยไม่ต้องใช้ WordPress ได้